Tool Bars, Ruler, Guides, Colors & Workspace
The Tool Bars, Ruler and Guides can be very useful in aligning images, text and shapes in a design and can be used in combination with the Snap to Guides feature.

Undo
It erases the last change done reverting it to an older state.

Redo
Reverses the undo or advances the buffer to a more current state.

Selection Tool
Select objects in the canvas area.

Hand Tool
Grab the canvas and move around.

Delete Tool
Delete the selected object.

Graphics Tool
Insert a graphic by clicking and dragging on the canvas area. When the Graphics Tool is selected, shape, color, angle, and position options are visible in the basic menu area.

Basic Menu
The following menu options can be selected when inserting graphics.
- Shape
- X & Y coordinates
- Width & Height
- Angle
- Color

Type Tool
Insert text or symbols. When the Text Tool is selected, color, position, size, and formatting options are visible in the basic menu area.
Basic Menu
The following menu options can be selected when inserting text or symbols.
- X & Y coordinates
- Width & Height
- Angle
- Font Orientation
- Bold
- Italic
- Weight
- Color
- Spacing
- Paragraph format

Rotate Left
Rotate the selected object left by 90 degrees.

Rotate Right
Rotate the selected object right by 90 degrees.

Fill Background
Opens the Color Picker window where you can select and fill the background with a color.

Zoom Tool Enlarge and reduce the view of the canvas area.

Preview
Preview the layout.

Change Book Type
Change the product type, size and/or add and remove pages.

Export Order File
Export high resolution PDF file to place your order.

Align Left Edges
Align selected objects with the left-most object in the selection.

Align Horizontal Centers
Center-align horizontally selected objects

Align Right Edges
Align selected objects with the right-most object in the selection.

Align Top Edges
Align selected objects with the upper-most object in the selection.

Align Vertical Centers
Center-align vertically selected objects

Align Bottom Edges
Align selected objects with the bottom-most object in the selection.

Uniform All Width
Make all selected objects the same width.

Uniform All Height
Make all selected objects the same height.

Uniform All Sizes
Make all selected objects the same width and height.

Vertical Space
Enter measure for equal vertical spacing between objects.

Horizontal Space
Enter measure for equal horizontal spacing between objects.

Equal Horizontal Spacing
Space objects horizontally and equally between the left and right-most objects in the selection.

Equal Vertical Spacing
Space objects vertically and equally between the left and right-most objects in the selection.
RULER
Make Visible or Hide
Go to Documents > Show Rulers
Unit
Default measurement unit is inches. To change the unit of measurement go to Document > Ruler Units or right-click on the ruler and choose new unit (inch, pixel, mm or %).
Change Origin Point
Drag the initial origin point from the upper left corner across the design area until the new point is reached.
Make Visible or Hide
Go to Documents > Show Guides
Add Guide
Place cursor over guide until it turns into a double headed arrow, then drag to new position.
Delete Guide
Place cursor over guide until it turns into a double headed arrow, then drag to ruler area or right-click and choose Delete.
Enable or Disable
Go to Documents > Snap to Guides
Create a Guides Template
Make Visible or Hide
Go to Document > Show Smart Guides
Use Smart Guides
Go to Documents > Show Rulers
Unit
Default measurement unit is inches. To change the unit of measurement go to Document > Ruler Units or right-click on the ruler and choose new unit (inch, pixel, mm or %).
Change Origin Point
Drag the initial origin point from the upper left corner across the design area until the new point is reached.
GUIDES
Use Guides to align text, images or graphics; and save as Guide Template for a consistent placement in future layouts. Make Visible or Hide
Go to Documents > Show Guides
Add Guide
- Click on the horizontal or vertical ruler area.
- Drag and drop guide where needed.
Place cursor over guide until it turns into a double headed arrow, then drag to new position.
Delete Guide
Place cursor over guide until it turns into a double headed arrow, then drag to ruler area or right-click and choose Delete.
SNAP TO GUIDE
Use Snap to Guides for a precise alignmet of text boxes, images or graphics. Enable or Disable
Go to Documents > Snap to Guides
Create a Guides Template
- Place guides at location of choice.
- Go to Documents > Save as Guide Template
- Label swatch
- Click OK
SMART GUIDES
Use Smart Guides to center vertically and horizontally within space; left or right align, and top or bottom align to other images or graphics. Make Visible or Hide
Go to Document > Show Smart Guides
Use Smart Guides
- Select an image or graphic to move.
- Click and drag around canvas area until smart guide appears.
- Place image or graphic where needed.
COLOR PICKER
Select a color from the AsukaBook Safe Colors (160 colors) or from the full color spectrum or enter RGB value.
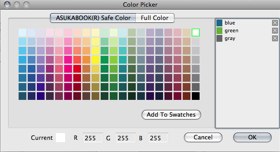
Add Color to Swatches
Add Color to Swatches
- Select color
- Click on Add to Swatches button
- Label swatch
- Click OK
- Click on the Color Picker icon
- Select one of the Swatch colors previously saved
- Click OK
- Click on the canvas area to change color
WORKSPACE
Your workspace shows Panels and Tool Bars.
Save a Custom Workspace
Only display the panels and tool bars you use most often by creating a custom workspace.
Restore your Custom Workspace if your panels have moved or closed.
Save a Custom Workspace
Only display the panels and tool bars you use most often by creating a custom workspace.
- Leave only the panels and tool bars you want open as well as their location.
- Go to Window > Save Panel Locations
Restore your Custom Workspace if your panels have moved or closed.
- Go to Window > Restore Saved Panel Locations
- Go to Window > Restore Default Workspace.