Design Options & General Process
Design your album with the New Book, Organizer, or take advantage of the quick Auto Layout feature.
JPG SAVING SETTINGS
Save your images with the following Photoshop settings prior to importing into AsukaBook Maker.
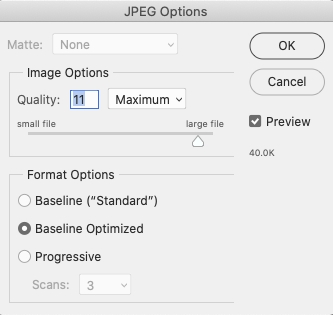
- Retouch/Enhance image.
- Flatten all layers - Layer > Flatten Image
- Save as JPG file with embedded color profile of AdobeRGB or sRGB - File > Save As.
- Image Options - Quality: 11 or 12 (Maximum)
- Format Options - Baseline Optimized
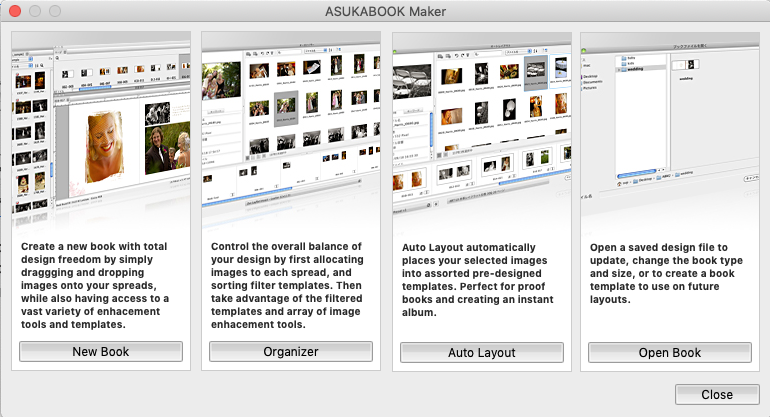
HOME SCREEN
The Home Screen will appear every time AsukaBook Maker is opened allowing you to select a design method.
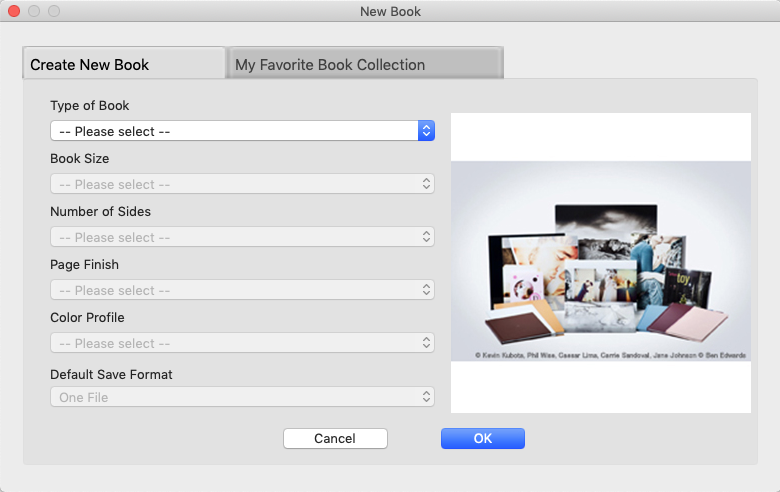
NEW BOOK WINDOW
The New Book window allows you to select the product and details for your new design project.
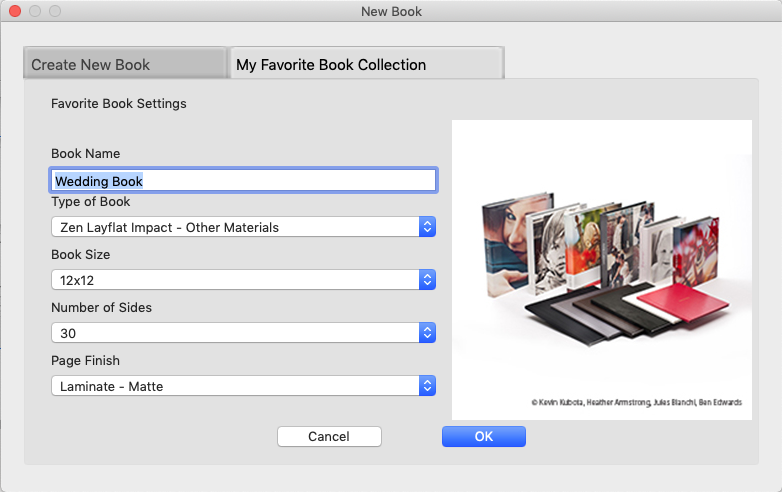
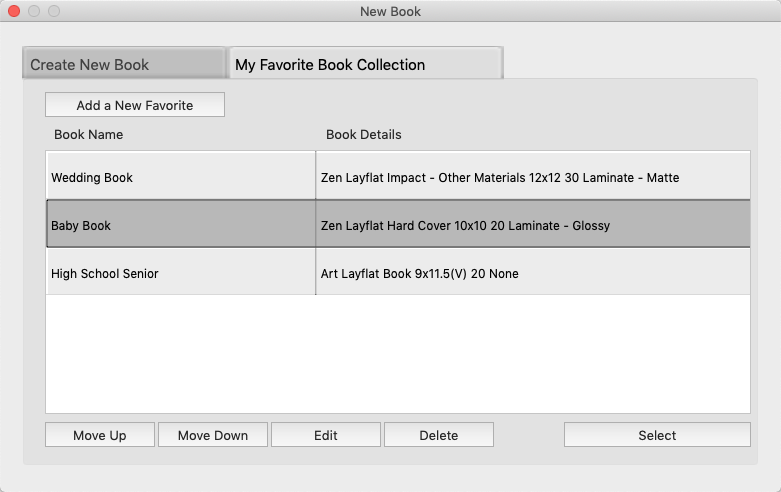
MY FAVORITE BOOK COLLECTION
Add most often used book products and details to your Favorite Book Collection for quick and easy access.
Arrange My Favorite Book Collection
Change the order of your Favorite Book Collection entries by moving them up or down the list, while having the ability to edit the book details and deleting the entry altogher.
Change the order of your Favorite Book Collection entries by moving them up or down the list, while having the ability to edit the book details and deleting the entry altogher.
Step 1 - CREATE NEW BOOK
- Go to File > New or select New Book from the ABM Homescreen.
- Select product details.
- Click OK.
Step 2 - IMPORT IMAGES
Follow the JPG Saving Settings under File Preparation prior to importing images into AsukaBook Maker.
Method 1
- Select the Image Folder panel.
- Click on the Open Folder icon.
- Navigate to your images folder location.
- Select images folder.
- Click Open.
- Select the Image Folder panel.
- Open a Finder / File Explorer Window.
- Navigate to your images folder location.
- Drag and drop folder onto Image Folder panel.
- Learn more about the Image Folder panel.
Step 3 - DESIGN CASE, COVER & PAGES
- Select the Pages panel.
- Double-click on either the case, cover, or page to be designed.
- Design a Custom or Template layout, or a combination of the two.
- Learn more about the Pages panel.
- Drag and drop images onto the canvas area.
- Size and position at desired location.
- Adjust the images zoom and position within its window frame, if needed.
- Add text, sloppy borders, masks, illustrations, background color, and apply any other image effects.
- Select the Templates panel.
- Drag and drop selected template onto the blank canvas area.
- Select the Image Folder panel.
- Drag and drop image onto template opening.
- Adjust the images zoom and position within its opening, if needed.
- Add text, sloppy borders, masks, illustrations, background color, and apply any other image effects.
- Learn more about the Templates panel.
Step 4 - SAVE PROJECT
- Go to File > Save.
- Select save-to location.
- Enter file name.
- Click OK.
- Save project often.
Step 5 - PROOF & SLIDESHOW
This step is optional.
- Click on the Pages panel.
- Click on the Sync with AlbumLayout website icon.
- Follow steps as prompted.
- Learn more about the AlbumLayout website.
Step 6 - EXPORT ORDER FILE
- Go to Tools > Export Order File.
- Click on Export Order File button.
- Select product details.
- Select save-to location.
- Name file or leave default name.
- Click Save.
Step 7 - PLACE ORDER
- Log into your AsukaBook account
- Click on the Upload PDF File button.
- Follow steps as prompted to place order.
ORGANIZER WINDOW
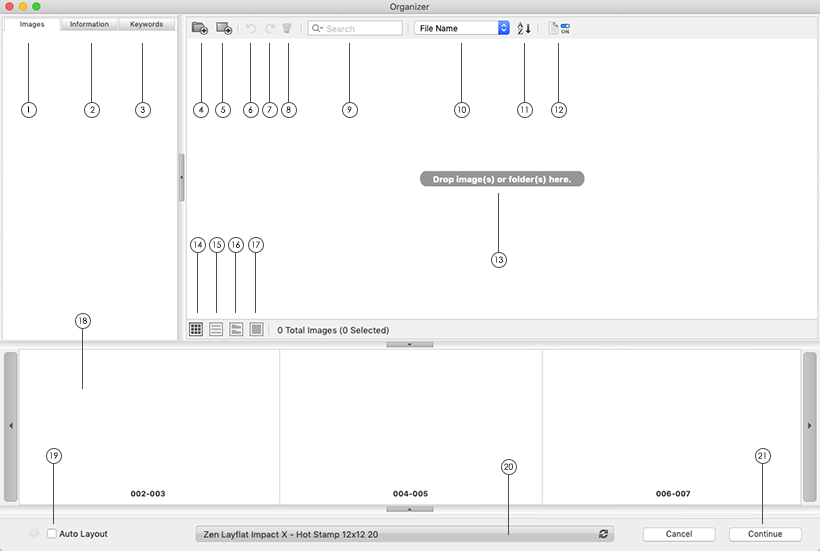
- Images: Image preview of the selected file.
- Information: Metadata of the selected file.
- Keywords: Add keywords to the selected image file.
- Select Image Folder: Navigate to your Image Folder to import.
- Select Image File: Navigate to your Image File to import.
- Rotate Left: Rotate selected image file to the left.
- Rotate Right: Rotate selected image file to the right.
- Delete: Removes the selected image from the Organizer window.
- Search Field: Search by File Name, Keywords, or Both.
- Sort: Sort by File Name, Capture Date, or Keyword.
- Sort Order: Sort by Ascending or Descending Order.
- Image Info: Show or hide the information below image thumbnail.
- Image Info: Area where to drop images to import.
- Thumbnail View: View thumbnail size.
- Keyword View: View by keyword.
- Folder View View by folder if more than one set of images were imported.
- Expanded View: View large image.
- Page Layout: Product pages.
- Auto Layout: Enable / Disable Auto Layout within Organizer mode.
- Close Project: Displays selected product and closes the project.
- Continue: Closes Organizer mode and opens the Design mode to further customize your layout.
Step 1 - CREATE NEW WITH ORGANIZER
- Go to File > New with Organizer or select Organizer from the ABM Homescreen.
- Select product details.
- Click OK.
Step 2 - IMPORT IMAGES
Follow the JPG Saving Settings under File Preparation prior to importing images into AsukaBook Maker.
Method 1
- Click on the Select Image Folder or Select Image File icon.
- Navigate to your images folder or image file location.
- Select images folder.
- Click Open.
- Open a Finder / File Explorer Window.
- Navigate to your image folder or image file location.
- Drag and drop folder or image onto image area within the AsukaBook Maker Organizer window.
Step 3 - ORGANIZE IMAGES
- Select a single or multiple images.
- Drag and drop onto a page.
Step 4 - DESIGN WITH ORGANIZER
Design a Custom Layout
- Click on the Continue button to proceed to design mode and further customize your layout.
- Check the Auto Layout check box within the Organizer mode.
- A layout will be auto populated based on the number of images that have been added to each page.
- Change the layout by clicking on the Layout Changes icon.
- Rotate the images within the layout by clicking on the Sort icon.
- Click on the Continue button to proceed to design mode and further customize your layout.
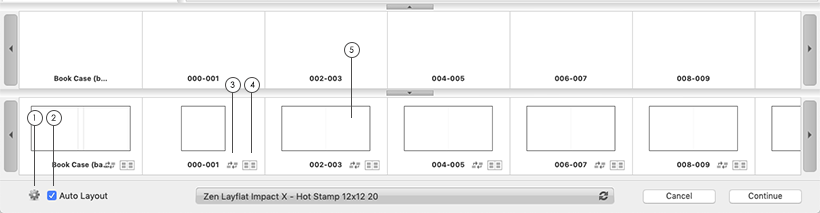
- Auto Layout Settings: Customize captions, background color, keyline, etc.
- Auto Layout: Enable / Disable Auto Layout within Organizer mode.
- Image Sort: Rotate images within layout.
- Layout Changes: Change the page layout within Organizer mode.
- Page Layout: Displays current layout with organized images.
Step 5 - SAVE PROJECT
- Go to File > Save.
- Select save-to location.
- Enter file name.
- Click OK.
- Save project often.
Step 6 - PROOF & SLIDESHOW
This step is optional.
- Click on the Pages panel.
- Click on the Sync with AlbumLayout website icon.
- Follow steps as prompted.
- Learn more about the AlbumLayout website.
Step 7 - EXPORT ORDER FILE
- Go to Tools > Export Order File.
- Click on Export Order File button.
- Select product details.
- Select save-to location.
- Name file or leave default name.
- Click Save.
Step 8 - PLACE ORDER
- Log into your AsukaBook account.
- Click on the Upload PDF File button.
- Follow steps as prompted to place order.
Step 1 - CREATE NEW WITH AUTO LAYOUT
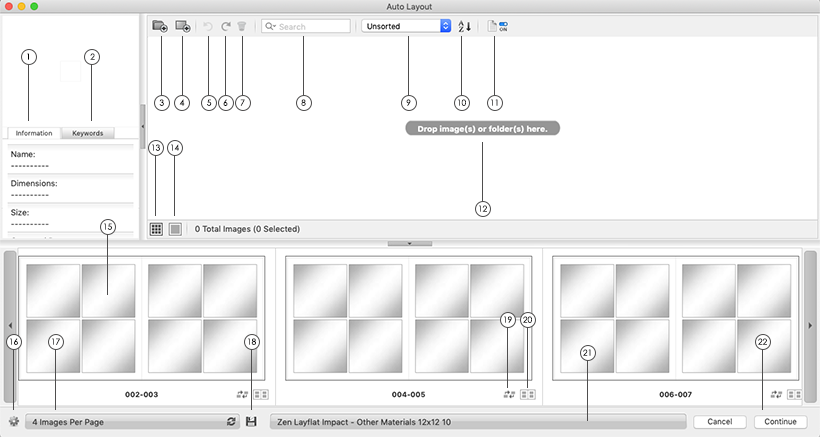
- Information: Metadata of the selected file.
- Keywords: Add keywords to the selected image file.
- Select Image Folder: Navigate to your Image Folder to import.
- Select Image File: Navigate to your Image File to import.
- Rotate Left: Rotate selected image file to the left.
- Rotate Right: Rotate selected image file to the right.
- Delete: Removes the selected image from the Organizer window.
- Search Field: Search by File Name, Keywords, or Both.
- Sort: Sort by File Name, Capture Date, or Keyword.
- Sort Order: Sort by Ascending or Descending Order.
- Image Info: Show or hide the information below image thumbnail.
- Drop Image Area: Area where to drop images to import.
- Thumbnail View: View thumbnail size.
- Expanded View: View large image.
- Pages: Displays all pages.
- Auto Layout Settings: Customize captions, background color, keyline, etc.
- Allocate Images: Select a preset number of images to allocate to each page.
- Saves as Custom Layout: Save layout as a custom template.
- Image Sort: Rotate images within layout.
- Layout Changes: Change the page layout within the Auto Layout mode.
- Selected Product: Displays selected product.
- Continue: Closes Organizer mode and opens the Design mode to further customize your layout.
- Go to File > New with Auto Layout or select Auto Layout from the ABM Homescreen.
- Select product details.
- Click OK.
Step 2 - IMPORT IMAGES
Follow the JPG Saving Settings under File Preparation prior to importing images into AsukaBook Maker.
Method 1
- Click on the Select Image Folder or Select Image File icon.
- Navigate to your images folder or image file location.
- Select images folder.
- Click Open.
- Open a Finder / File Explorer Window.
- Navigate to your image folder or image file location.
- Drag and drop folder or image onto image area within the AsukaBook Maker Auto Layout window.
Step 3 - DESIGN
- A layout will be auto populated based on the seleted number of images per page.
- Change the layout by clicking on the Layout icon.
- Rotate the images within the layout by clicking on the Rotate icon.
- Click on the Continue button to proceed to design mode and further customize your layout.
Step 4 - SAVE PROJECT
- Go to File > Save.
- Select save-to location.
- Enter file name.
- Click OK.
- Save project often.
Step 5 - PROOF & SLIDESHOW
This step is optional.
- Click on the Pages panel.
- Click on the Sync with AlbumLayout website icon.
- Follow steps as prompted.
- Learn more about the AlbumLayout website.
Step 6 - EXPORT ORDER FILE
- Go to Tools > Export Order File.
- Click on Export Order File button.
- Select product details.
- Select save-to location.
- Name file or leave default name.
- Click Save.
Step 7 - PLACE ORDER
- Log into your AsukaBook account.
- Click on the Upload PDF File button.
- Follow steps as prompted to place order.